Varsayılan olarak iTunes veya Finder, iOS cihaz yedeklemelerini dahili sürücüde derin bir şekilde gömülü bir klasöre yapar. Etkinleştirebileceğiniz ve farklı bir konum seçebileceğiniz belirli bir ayar yoktur. Bu yedeklemeler birden çok gigabaytta çalışabilir. Bu nedenle, daha iyi depolama yönetimi için, Mac'inizde veya PC'nizde iPhone yedekleme konumunuzu değiştirmek isteyebilirsiniz. Varsayılan iOS yedekleme konumunu nasıl taşıyabileceğinizi size göstereyim.
- MacOS Catalina veya Üstünü Çalıştıran Mac'te iPhone Yedekleme Konumunu Değiştirme
- İPhone Yedekleme Klasörünü Mac'teki Orijinal Konumuna Geri Yükleyin
- İPhone Backup Extractor kullanarak iTunes Yedekleme konumunu değiştirin
- Zaten iTunes Yedekleme Konumu Değiştirildi Ancak Yedeklemeyi Göremiyor musunuz?
- Windows PC'de iTunes iOS Yedekleme Konumu Nasıl Değiştirilir
MacOS Catalina veya Üstünü Çalıştıran Mac'te iPhone Yedekleme Konumunu Değiştirme
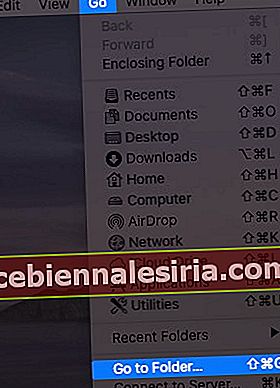
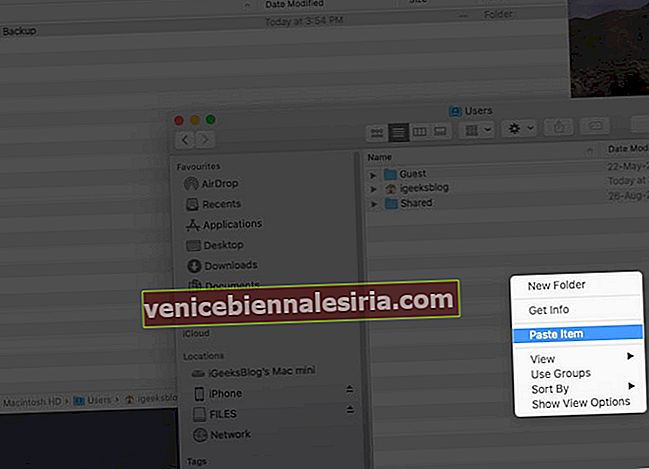
- Üst menü çubuğundan Git → Klasöre Git… seçeneğine tıklayın. Bu tam adresi yazın veya kopyalayıp yapıştırın ~ / Kitaplık / Uygulama Desteği / MobileSync.

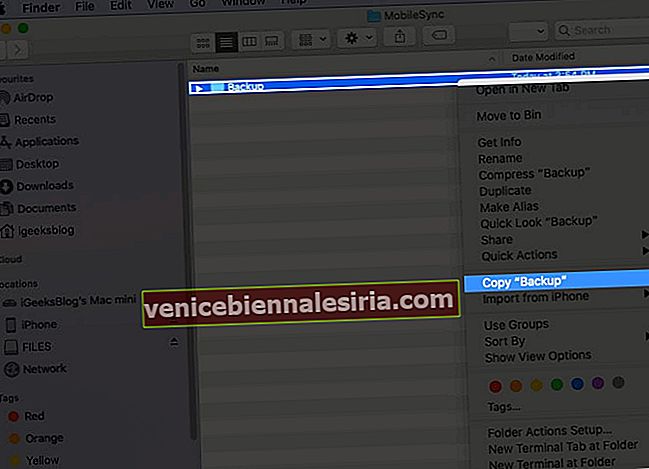
- Artık Mac'inizin varsayılan olarak yedeklemeleri yaptığı konumdasınız. Yedekleme klasörüne sağ tıklayın ve “Yedeklemeyi Kopyala” seçeneğini seçin .
- Şimdi, (ikinci bir Finder penceresi açın ve) yeni iPhone yedekleme klasörünüzü istediğiniz yere gidin. Masaüstü, Belgeler, bir yerde yeni bir klasör olabilir. Bu konumdayken, sağ tıklayın ve Öğeyi Yapıştır'ı seçin . Mevcut Yedek klasörünü bu yeni konuma kopyalama işlemi bitsin. Bu Finder penceresini açık tutun. Buna aşağıdaki 6. adımda ihtiyacınız olacak.
- Kopyaladıktan sonra, ilk Finder penceresine (~ / Library / Application Support / MobileSync) geri dönün, Yedekleme klasörüne sağ tıklayın ve Yeniden Adlandır'ı seçin (veya klasörü seçin ve enter tuşuna basın).
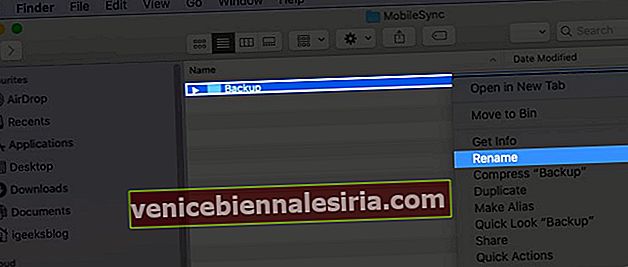 Şimdi dosya adına .old ekleyin . Sonuç olarak, bu klasör adı Backup.old gibi görünecektir.
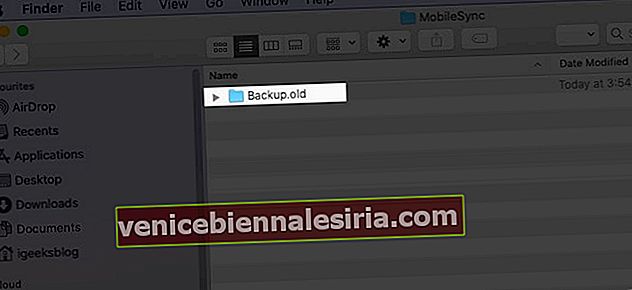
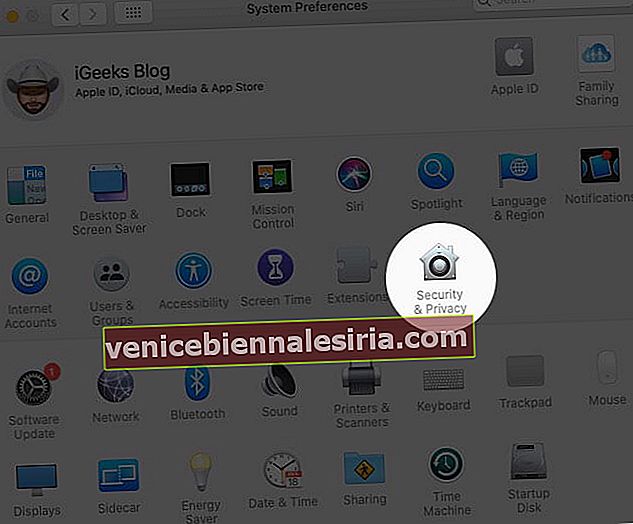
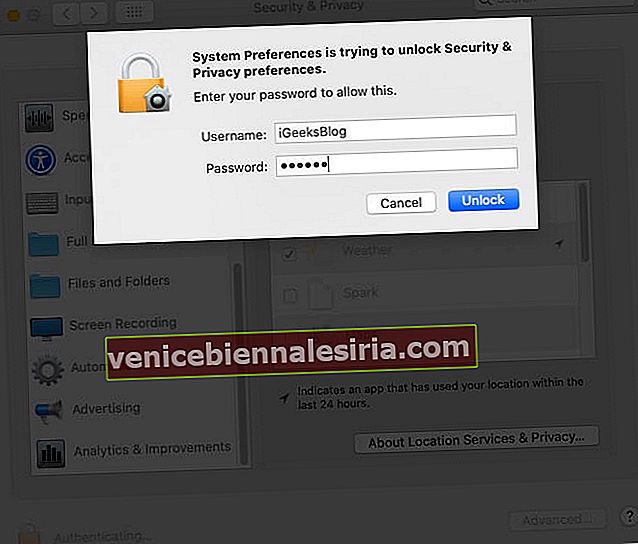
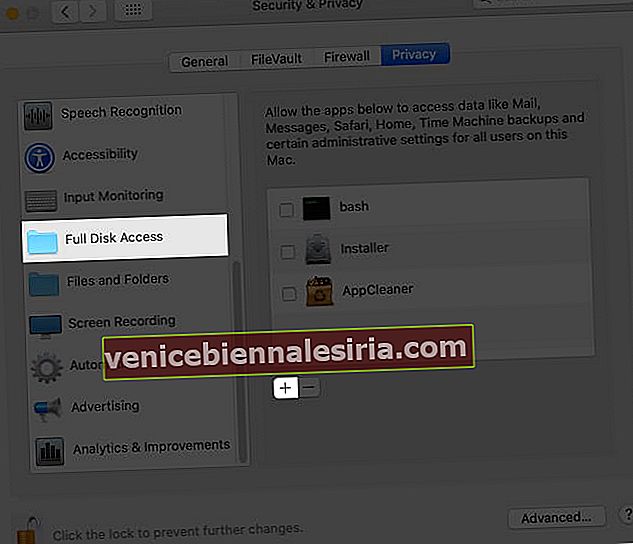
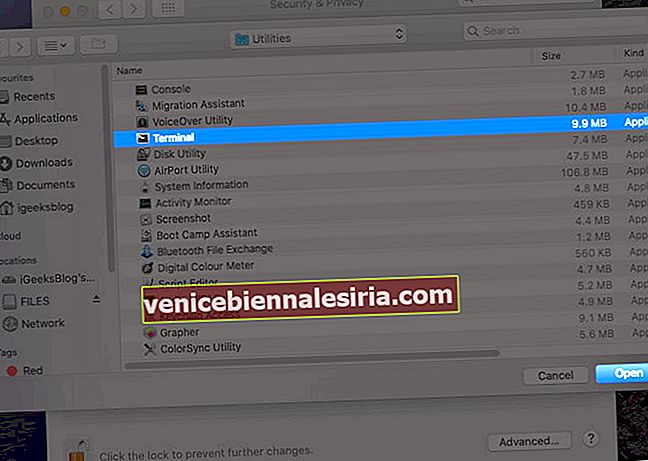
- Sol üstten Apple Logosu → Sistem Tercihleri → Güvenlik ve Gizlilik → Gizlilik sekmesine tıklayın → kilit simgesine tıklayın ve devam etmek için Mac'inizin şifresini girin.Şimdi sol Kenar çubuğundan Tam Disk Erişimi'ne tıklayın → küçük artı ( + ) simgesi. Uygulama → İzlenceler klasöründen → Terminal'i seçin ve Aç'a tıklayın . Bundan sonra tekrar kilit simgesine tıklayıp bu pencereyi kapatabilirsiniz.

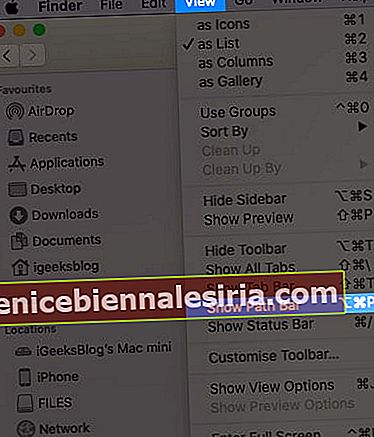
- Şimdi, yeni Yedekleme klasörünün tam yerini bilmeniz gerekir. Bunun için Finder penceresinden, üst çubuktan Görünüm'e tıklayın ve Yol Çubuğunu Göster'i seçin . Alt kısımda size bu yeni Yedekleme klasörünün tam yerini söyleyen ince bir sıra göreceksiniz. Bu pencereyi açık tutun.

- Command + Boşluk Çubuğu'na basın , Terminal'i arayın ve açın. Ardından, aşağıdaki komutu bilgisayarınıza uyacak şekilde düzenlemeniz ve ardından Terminal penceresine yazmanız / yapıştırmanız gerekir.
ln -s /Volumes/Drive/Backup/ ~/Library/Application\ Support/MobileSync/ - Çok Önemli: Yukarıdaki komutu düzenlemek: Düz bir not defteri uygulaması veya editpad.org gibi bir site açın. Şimdi, lütfen yukarıdaki komutu kopyalayıp oraya yapıştırın. Ardından, / Volumes / Drive / Backup / öğesini Yedekleme klasörünüzün konumuyla değiştirmeniz gerekir.
Örneğin, yukarıdaki ekran görüntüsüne bakın. Yedekleme klasörümün konumu Macintosh HD → Kullanıcılar → Yedekleme şeklindedir . Yani komut şöyle görünecek:
ln -s /Volumes/Macintosh\ HD/Users/Backup/ ~/Library/Application\ Support/MobileSync/Bir konum adının Macintosh HD gibi iki veya daha fazla parçası / kelimesi varsa, ters eğik çizgi ve tek boşluk koymanız gerekir. Örneğin, Macintosh \ HD
ln -s /Volumes/Donald/Backup/ ~/Library/Application\ Support/MobileSync/ln -s /Volumes/Donald/iPhone/Backup/ ~/Library/Application\ Support/MobileSync/Now, you know how to change the path address in the command. Next, let us make use of it.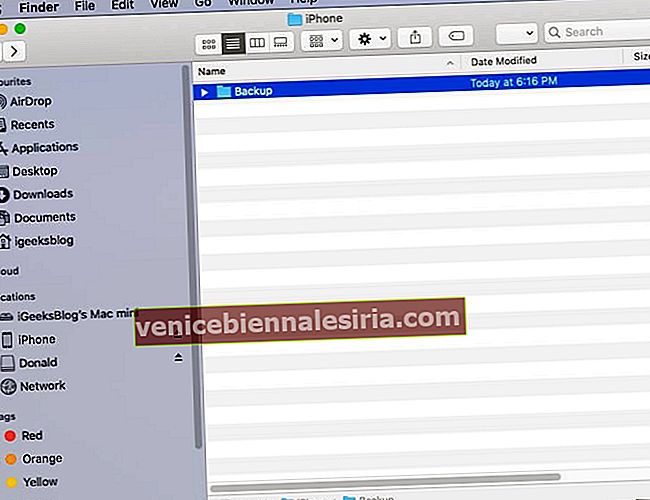
Copy the final command, paste it in the Terminal, and press the enter key.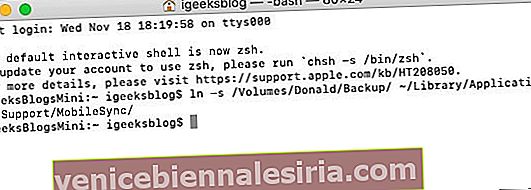 Tip: Now, when you go to the original Backup.old Finder window, you will see a new folder named Backup, which will have a small arrow on it.
Finally, open Finder on your Mac, connect the iPhone, Trust it, and click on Back Up Now. The backup would be made and saved at the new location.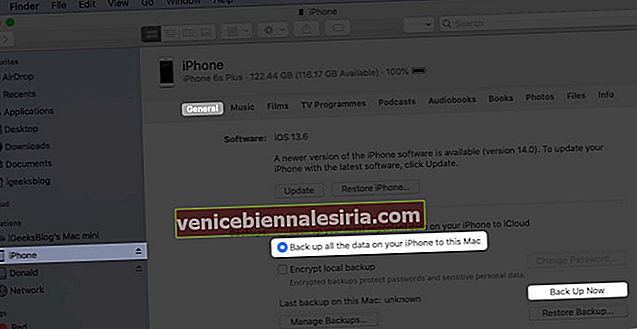


 Şimdi dosya adına .old ekleyin . Sonuç olarak, bu klasör adı Backup.old gibi görünecektir.


 Tip: Now, when you go to the original Backup.old Finder window, you will see a new folder named Backup, which will have a small arrow on it.
Notes:
Optional: After you complete the first backup at the new location, you may choose to delete the Backup.old folder. This may free significant space on your Mac.If you opted to back up your iPhone to an external drive, make sure you connect it to the Mac before hitting Back Up Now in the future.
Restore iPhone Backup Folder to its Original Location on Mac
From the Finder window, click on Go → Go to Folder → and enter this location ~/Library/Application Support/MobileSyncRight-click on the folder with an arrow icon and select Move to Bin.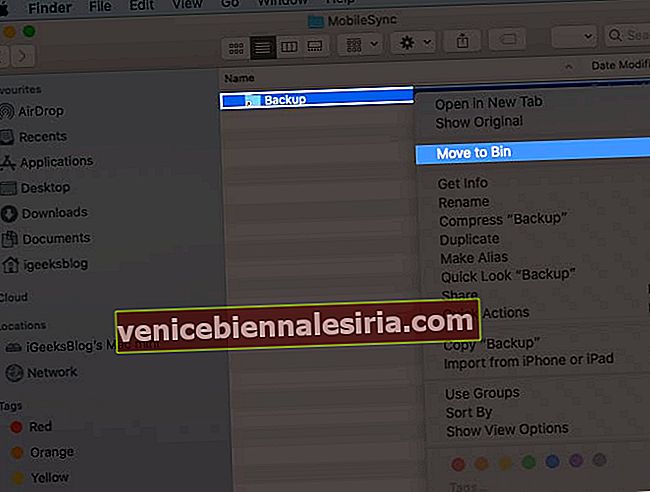
Now, for safety, drag (or copy-paste) the current Backup folder to this location. All future iPhone backups will be saved here, like before. Even if you do not follow this step, the next time you make the device backup, a new folder named Backup will automatically be created.

Do you not want to follow the lengthy process above? Well, here is the most straightforward way to change the iTunes/Finder iPhone backup location on Mac.
How to Change iTunes Backup Location Using iPhone Backup Extractor
Download iPhone Backup Extractor for free and complete the installation.Important: First time, you may have to open the System Preferences → Security & Privacy → Privacy tab → click on the padlockicon, and enter your Mac’s password. Now, click on Full Disk Access and then the plus sign (+). Next, select iPhone Backup Extractor and click Open.
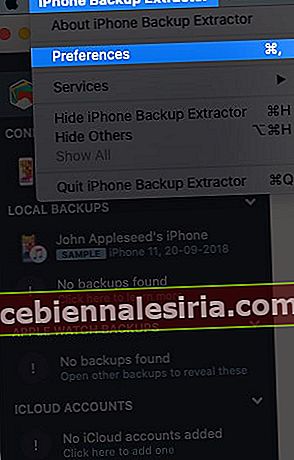
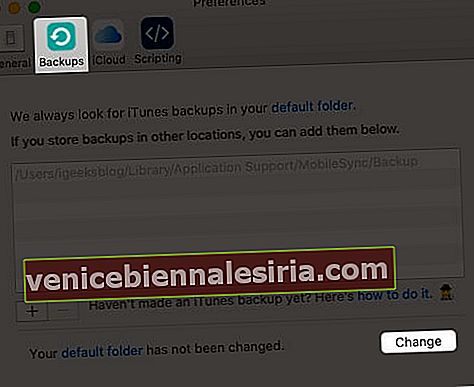
Now come back to the iPhone Backup Extractor app window. (If needed, click on ‘OK, I’ve made this change, let’s restart the app to continue!’) From the top menu bar, click on iPhone Backup Extractor → Preferences → Backups → Change. Now, you may see a popup saying ‘Backup contains data.’ Click on ‘Open.’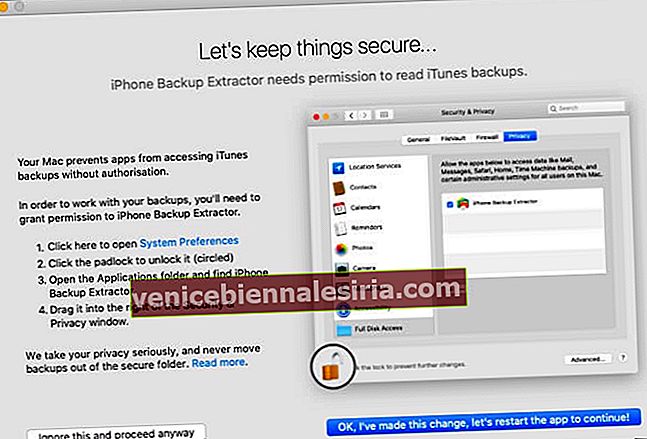
From here, drag the folder with a lengthy name like 149652….. to someplace else, like the Desktop.After that, inside the iPhone Backup Extractor app, click on Change and Select the desired folder.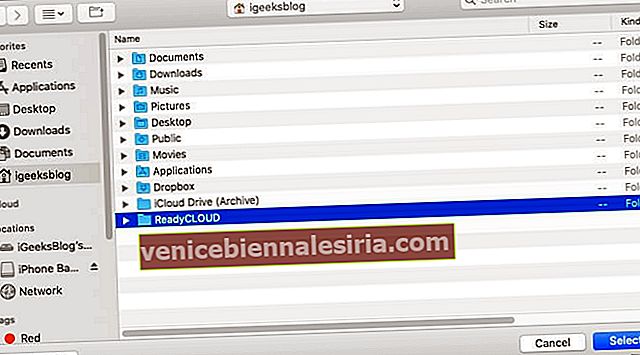


Done! You have successfully changed the iPhone backup folder in just a few steps. To undo this change, click on Revert.
Already Changed iTunes Backup Location But Unable to See the Backup?
Even after you have correctly followed the above steps and are unable to find the backup, then we have a separate guide that has you covered.
Most of the time, if you follow the first manual step, the problem arises due to the wrong location address of the new Backup folder. You must get that right. If this is wrong, go to ~/Library/Application Support/MobileSync and you will see a white Backup symlink instead of a blue folder named Backup with an arrow.
How to Change the iTunes Backup Location on Windows PC
As iTunes won’t let you change it, you need to make way through a symbolic link. Also known as a symlink, it’s a bridge that connects two folders with the same name. Using a symlink, you can direct iTunes to back up data to a dummy folder that you’ll have to create. However, you’ll have to enter some commands in the “Run As Administrator” window. Just make sure that you create a dummy folder in a drive with enough storage space. Like, we created it in D:\. Let’s get started by creating a folder first.
Create a folder named “MobileSync” in the D:\ (d stands for drive) on your computer.To view the by-default location, go to C:\Users\UserName\Apple\MobileSync if you have downloaded iTunes from Windows 10 Store. For the old desktop version, you need to go to C:\Users\UserName\AppData\Roaming\Apple Computer\MobileSyncCut and paste the Backup folder to the new MobileSync folder that you’ve created in D:\Now, run CMD as administrator. To do so, press Windows + R keys together, then type cmd in the search field.Press Ctrl + Shift + Enter to run it as in the administrator.Enter the command mentioned below.
If you’ve downloaded iTunes from the Microsoft store. MkLink /J “C:\Users\UserName\Apple\MobileSync\Backup” “D:\MobileSync\Backup
Enter this code MkLink /J “C:\Users\UserName\AppData\Roaming\Apple Computer\MobileSync\Backup” “D:\MobileSync\Backup” if using the older version.
Now when you back up your iPhone using iTunes, the data will be stored in the D:\MobileSync\Backup folder. Try backing up your iPhone and check if the Backup folder in the D:\ is configured correctly.
iPhone Backup Location Changed Successfully!
This is how you can have new iOS or iPadOS backups to a different location. Changing to some other folder on the same internal disk makes little sense. But doing the same on an external disk frees space on your internal disk.
I hope the above guide was helpful. In case you are facing difficulty at any step, feel free to reach us via the comments section below.
You may also like to read:
Find iPhone Backup Location on Mac and Windows PC3 Ways to Check Folder Size on MacHow to Use Control Center in macOS Big SurHow to Backup and Install iPhone Apps from Mac/Windows Without iTunes


![2021'de Mac için En İyi IDE'ler [Entegre Geliştirme Ortamı]](https://pic.venicebiennalesiria.com/wp-content/uploads/blog/1342/26RAMJ560Upic.jpg)